Showing posts with label sugar free. Show all posts

Friday, January 18, 2013

A Very Necessary Condiment: Heinz-ish Ketchup

Come and view this post on my new page:  Red Hill Recipes


I grew up in Canada, and let me tell you, we North Americans like our condiments. A well stocked North American fridge should have at least an entire shelf given over to condiment storage (or most of the narrow shelves on the fridge door anyway). There really ought to be ketchup, mustard (yellow for sure, dijon and seeded as well maybe), relish (two or three kinds), BBQ sauce and mayo, as the bare minimum. And that’s not to mention thousand island, ranch and italian salad dressings (as well as a few others probably). HP sauce, steak sauce, tabasco sauce, tartar sauce. And then there are the Asian sauces: hoisin, plum, sweet chilli, teriyaki, et al. Am I missing any regulars? I’m sure I am. I’m not as current with the condiment trends as I should be. An old friend of mine mentioned mushroom ketchup the other day, and I had never even heard of that before (it does sounds amazing).


Having lived in Australia for over 16 years now, and condiments not being quite as important a part of the culture here, I had already cut back on the selection in my own fridge before cutting out sugar. But I could still have put together a very well dressed hotdog or burger. In Australia a well dressed hamburger would not be considered so without beetroot, fried egg, and maybe a pineapple round or a sausage for good measure (along with the usual meat patty, cheese slice, tomato and lettuce). But there would likely be only BBQ sauce on it. (!!!) A North American could happily accept one with just meat, cheese, tomato and lettuce (bacon and onion might be considered essential too), but the burger could not be considered well dressed were it not spread with ketchup, mustard, relish, and preferably mayo as well. At least. Probably BBQ sauce too, among other logical possibilities. A proper burger ought to be good and messy. (Mind you, a piece of beetroot also has certain qualities that can up the ante in the mess stakes. I have to give it that, if nothing else.)

But sauce. (This post is about sauce, not burgers.) There is a nasty reality check in store for anyone who decides to cut out sugar, and then starts reading condiment labels. Sugar is in everything! Sometimes masses of it. It’s an effort, but I have been learning to make my own condiments with ingredients I feel better about. I’m not one to give up on delicious-ness just because the store bought version is full of rubbish.


Who wants to contemplate french fries with no ketchup? Not I! (Unless there is a nice pot of gravy nearby instead...). So I set out to see if I could come up with something suitably Heinz-ish enough to satisfy my very discerning (read: fussy), sauce-loving offspring. And not too labour intensive.

The verdict, when served with steak, salad and fries, was: ‘Two thumbs up and 10 outa 10!’ This was communicated in hand signals as the mouth was stuffed full, and busy chewing.

I’ll take that as a win.


Ketchup

This recipe is adapted from this one, and makes about 1 1/2 cups.

Ingredients

2/3 cup (170gr) tomato paste (Preferably organic. I check the labels and choose whichever brand has no added sugar, and lowest sugar content. Tomatoes are quite sweet by nature, so there are some natural sugars in a concentrate - usually about 2.5-3gr per 25 gr.)
1/2 cup (160gr) glucose syrup
1/2 cup (110gr) white vinegar
1/2 tsp salt (or to taste)
1/4 tsp onion powder
1/8 tsp garlic powder
1/4 tsp smoked paprika
1/16 tsp ground cloves
1/16 tsp dry mustard powder
1/16 tsp pure non-bitter stevia powder

Directions

1. Add all ingredients to a small saucepan.
2. Bring to a boil.
3. Simmer for 20-30 minutes, stirring occasionally.
4. Let ketchup cool, and then refrigerate.
5. Serve with everything except dessert.

The preservative qualities of vinegar, glucose syrup, and salt will allow this to stay fresh in the fridge for weeks.


Tuesday, January 15, 2013

Crème Brûlée: Velvety. Melty. Creamy. Crunchy.

Come and view this post on my new page: Red Hill Recipes


I am trying to decide what my favorite thing about Crème Brûlée is. The velvety texture? The way each spoonful is firm for a moment, and then melts in my mouth? The creamy sweet-but-not-too-sweet vanilla flavour? The contrast of a crunchy caramelized topping?

The fact that it does not incite the carb guilts the way wheat laden treats do?


Historically, whenever a dessert menu read ‘Crème Brûlée’, my dessert resistance dissolved, and my order was a given. No other item could hold a candle in comparison. (Well, maybe Citrus Tart, but that is a love story for another day.) Nowadays though, I am strong. Even when those tempting words ‘Crème Brûlée’ float in front of my eyes, I resolutely continue down to the bottom of the menu, hoping to see the words ‘Cheese Plate’. Otherwise I’m out of luck ...just a decaf flat white for me. Because other than the cheese plate, the whole dessert menu is Fructose-City.


Recently though, when my slightly less strong husband ordered the Crème Brûlée (deemed ‘to die for’ by the inhabitants of the neighboring table), I admit to having a tiny little taste of his. Luckily we didn’t die. (And we reserve the right to be doubtful of that particular attribute in any sort of food, except perhaps arsenic.) But it was very good.

That was 4 days ago, and I’ve been dreaming of the taste on my tongue ever since.


I have actually been making crème brûlée since early on in my fructose free life. On top of it's other desirable qualities, it's gluten free and nearly low carb (dextrose does have carbs though, and I plan to do experiments with stevia to reduce that one day soon). I didn’t know what to do about the topping though. That is usually made with brown sugar. I ended up making a raspberry sauce and using that. It was fine. Quite good. Rather edible. Adequate.

But not amazing.

Crème Brûlée, I discovered, kind of needs it’s crunchy caramelized topping for amazing-ness.


Anyway. The good news is, that since then, experiments with various fructose free sweeteners, a piece of aluminium foil on a stone bench, and a kitchen blow torch, have proven that dextrose caramelizes. Very nicely indeed. (So does glucose syrup, but it took forever, and then burned too quickly).

So today I shall submit to the longings of my tongue, and make Crème Brûlée in my own kitchen. Fructose free. With crunchy caramelized topping. And the Cheese Plate can take the back seat.


Crème Brûlée

This recipe makes 6 small or 4 large serves.

Ingredients

2 cups (475 gr) Cream
1/2 cup (90 gr) Dextrose
5 Egg yolks
1 Vanilla bean
1 tsp Vanilla extract/essence

For topping:

1/3 cup Dextrose

Directions

1. Add cream, dextrose and vanilla extract to a microwavable bowl or jug. Gently stir to combine (you don't want to whip the cream or add any bubbles).
2. Using a small sharp knife, cut the vanilla bean in half lengthwise. Scrape the seeds off with the knife. Stir seeds into the cream.
3. Separate eggs, set the whites aside. Whisk egg yolks till smooth.
4. Heat cream mixture in microwave for 2 1/2 minutes.
5. Gently stir yolks into cream.
6. Pour mixture through a fine sieve to remove any lumps. Force the vanilla seeds through with a small spoon - discard the lumps.
7. Pour into ramekins, 6 small or 4 large. (You could place it all in one container, and make one big one too, and bake it for longer.)
8. Place the filled ramekins into an oven dish, pour boiling water into the oven dish until it comes to about half way up the sides of the ramekins (take care not to tip any water into your crème brûlée!).
9. Bake at 160C (320F) for about 30-35 minutes, (turning half way through if your oven temps are uneven). They should look a little wobbly still, but not liquid. If in doubt give it an extra 5 minutes.
10. Remove ramekins from oven dish, and let cool for 15 minutes or so, then place in the fridge for a few hours (or overnight).
11. Just before serving, cover the top of each crème brûlée with a shallow layer of dextrose (I used a heaped teaspoon for each), then, using a kitchen blow torch carefully caramelize the dextrose topping. And serve!


Monday, January 14, 2013

A Birthday Cake: 9 Year Old Boy Style

Come and view this post on my new page:  Red Hill Recipes


It seems I have gotten into a ritual of birthday cake sculpture for my kids. I have always tried to do something in keeping with whatever their current obsession happens to be. (Ninjago, in the case of my 9 year old son this year). When I began this I only had one little baby. And making one little fancy cake each year didn’t seem especially onerous... Now I have 4 kids (who insist on having a birthday every year), and they are much more confident in my cake architecture skills than I am.


It’s kind of a labour of love... My ‘thing’, if you will. But the trouble is, I’m never quite certain (until after) that I can pull it off! And I’d hate to disappoint the birthday kid...

This topic came up with my sister Karen a few weeks ago, and she said ‘Enjoy it, my boys don’t want fancy cakes anymore!’. So remembering this, I tested the waters with Jamen last week. It went something like this:
Me: ‘Jamen, are you over fancy cakes? Some kids get sick of fancy ones when they get older.’
Jamen: ‘No I’m not sick of them. I want a fancy cake!’
Me (a little later, showing him an example on google images of the theme I was thinking of): ‘What do you think of this?’
Jamen: ‘Oh. That’s ok. ...But you can do better than that Mom!’
Me: Sigh...

So instead of being off the hook, I was kind of committed to another behemoth cake feat.

No, I have never studied psychology. Why do you ask?

Admittedly, the birthday cake process was easier before we decided to quit sugar. There are all those handy cake packet mixes and tubs of ready-made frosting available! And if that seems too hard, one can BUY cakes that are already made and decorated!

None of them are fructose free though.

So these days of course, one has to do the entire thing from scratch. Which is fine. I do take some pride in that... And besides, I have got a preference for edible cakes wherever possible. (As opposed to many of the bought ones which are made of styrofoam and covered in so many cubic meters of icing that you can barely eat them.)


I wasn’t actually planning on blogging this recipe yet, but feedback from the party-going, cake-eating participants was super positive, so even though this recipe has not been tweaked quite to my satisfaction, I have decided to share...

It is completely fructose free except for the black licorice strap (which nobody in our family eats anyway) and the silver cachous I used for the decorations.


Yellow Layer Cake
I have made heaps of changes, but this recipe is adapted from this one.

Ingredients

4 1/4 cup (520gr) cake flour (you can make your own: 3/4c plain/all purpose flour + 1/4c corn flour/starch make 1 cup of cake flour)
2 tsp baking powder
1 1/2 tsp bicarb soda/baking soda
1 tsp salt
1/4 tsp stevia
1 cup (250gr) softened unsalted butter
1/3 cup glucose syrup
1/2 cup rice malt syrup
2 tsp vanilla
4 eggs
1 1/2 cup buttermilk ...shake well before measuring (you can make your own - see note below)

Even Better Buttercream Icing

1 cup (250 gr) unsalted butter
3 cups icing dextrose (see note below about how to make this)
1/2 tsp vanilla
1/4 cup sour cream
pinch of stevia (to taste)

Directions

1. Cream butter and dextrose together till very pale. Add glucose syrup, rice malt syrup, and vanilla. Beat till combined.
2. Add eggs one at a time, beating well and scraping down sides of bowl between each one.
3. Add buttermilk, beat till just combined (it should look curdled not smooth)
4. Sift flour, baking powder, bicarb soda, salt and stevia together in a separate bowl, whisking to make sure they are well combined.
5. Add 1/3 of flour mixture at a time, gently beating till just combined (you want to beat the flour as little as possible to keep the cake tender).
6. Place batter into a cake tin (or tins) lined with baking/parchment paper (or grease and flour the tin). I used one large square tin (25x25cm/10x10 inch) so I could cut it up into the shapes needed for a Lego Ninjago man. But this recipe would be even better made into two 23cm/9in round or 20cm/8in square layers. Rap the tin onto the bench a few times to force the bubbles out.
7. Bake at 160C (320F) for approx 45-50 mins (less if making 2 layers! Try 35-40 mins). Turn half way through baking if your oven bakes unevenly. Bake till a skewer comes out clean when poked into the centre of the cake.

Even Better Buttercream Icing

1. Beat butter until very pale.
2. Add icing dextrose 1/4 cup at a time, beating between each addition (this makes it thicken with less dextrose needed)
3. Add vanilla, stevia and sour cream. Beat until smooth.

Notes:

Icing dextrose: Add the dextrose to a food processor or blender and pulse/blend till very, very fine (like icing sugar!). You will need to stir it a few times, but let it settle before taking the lid off or you will have clouds of powdered dextrose floating around your kitchen! I like to blend a whole packet of dextrose at a time, and keep it in a container ready for the next icing episode.

Buttermilk: To make one cup of buttermilk, measure slightly less than one cup of milk. Add 1 Tbsp (20 ml) of lemon juice or vinegar. Wait 5 minutes then stir. Voila!


Tuesday, January 8, 2013

The Cinnamon Bun Rescue

Come and view this post on my new page:  Red Hill Recipes


When I was a little girl my Mom would bake bread every so often. It was an all day project yielding dozens of loaves, most of which were destined for the big chest freezer, and from there, loaf by loaf to our lunch boxes. She usually did this when my sisters and I were at school. I loved Bread Baking Day because the last lump of dough was always made into cinnamon buns, and thoughtfully timed so that they were coming out of the oven (smelling utterly divine) just as we girls walked in the door after school. Thusly began my long, affectionate, decadent (and sometimes rocky) relationship with cinnamon buns. All would be smooth sailing, I’m sure, if only they were healthier.


 Sigh... The carbs! The butter! The sugar!

...Well it seems that nothing can be done about the carb guilts. But ah! ...the sugar guilts can easily be done away with now, armed as we are with some new knowledge and having done some recipe trials. And as a bonus, the said new knowledge also kindly lifts the butter guilts - it turns out that there’s hardly anything healthier than good old delicious butter! (Yes, veggies, I know, but they have no place in this paragraph, so shh). Two guilts down, one to go.

And we are back to just carb guilts. Happily though, I can handle that once in a while.


 This is one of those whiles.


Of all the cinnamon bun recipes I’ve tried I like this one best. Most home baked cinnamon buns need to be eaten pretty quick or they dry out (full sugar or fructose-free, it makes no difference). But these stay nice and soft and seem freshly baked a day later (I can bring out witnesses to this phenomenon if you don’t believe me!). This recipe saves sweetening the buns until we drizzle them with glaze icing just before serving, so they stay soft (instead of letting the dextrose sit all over them, sneakily drawing the moisture out while we wait to indulge).

Of course they tend to do a quick disappearing act right after leaving the oven. But theoretically, it’s possible to surprise everyone in the house with fresh cinnamon buns some Saturday morning (and not have to get up at 4am in order to do so). If you want to bake now and serve later, this is your recipe. They are quite delicious now though, so good luck with that.


Cinnamon Buns

This recipe is adapted from the King Arthur Flour one and makes 18 buns

Dough

3 1/2 cups (420 gr) bakers flour (plain/all purpose flour will work too if you haven't got that)
2 tsp instant yeast
2 Tbsp (20 gr) (I use a 20 ml tbsp not 15 ml!)potato flour (or 1/4 cup instant mashed potato flakes)
2 Tbsp (20 gr) milk powder (dry milk)
3 Tbsp (35 gr) dextrose
1 1/2 tsp salt
4 Tbsp (60 gr) softened butter
2/3 cup (150 gr) lukewarm water
1/2 cup (115 gr) lukewarm milk

Filling

1 Tbsp cinnamon (20 ml)

Topping

2 Tbsp melted butter

Cinnamon Glaze Icing
1/4 cup (60 gr) cream cheese
2 Tbsp cream
1/4 tsp cinnamon
1 cup dextrose

Instructions

Oven temp 160C (320F)

1. Add all of the dough ingredients to a large bowl, mix and knead. You can use your hands, a mixer with a dough attachment, or bread machine with dough setting (I use my thermomix).
2. When the dough is smooth and soft, shape it into a ball, and put it in a greased bowl. Cover the bowl, leave it in a warm place and let it rise for about 90 minutes (or till doubled in size).
3. Gently punch the dough down, and place it on a lightly greased surface.
4. Roll the dough out into a rectangle shape about 30cm (12in) by 46cm (18in). Sprinkle all over with cinnamon (I like to use a small sieve).
5. Starting from the long side, roll the dough up into a long log and pinch the edges together to seal. You can stretch the log a bit if the dough has 'shrunk' during rolling.
6. Using a ruler or tape measure, make a knife mark on the log at 2.5cm (1 in) intervals. Cut the dough into rolls using your marks to make them even. The easiest, neatest way is to use dental floss for this. Slip a string of floss under the log, bring the ends together over one of your marks and pull tight till the floss cuts right through.
7. Place the cut rolls into a greased baking pan, spacing them evenly apart. I use a 33x23x5cm (13x9x2in) ceramic baking dish, but you could use two smaller ones, or whatever other convenient pans you have on hand.
8. Let the buns rise until they are all puffy and cozily crowded together, about 90 minutes.
9. Bake at 160C (320F) for 20-24 minutes, turning half way through (unless your oven bakes more evenly than mine). They should look golden brown, and spring back when gently touched in the center.
10. Brush the buns with melted butter (I like salted butter for this). Let them cool slightly (if you can resist that long).

Cinnamon Glaze Icing
1. Add cream cheese, cream, cinnamon, and dextrose to a small saucepan, heat on medium until the cream cheese melts and the dextrose dissolves. I use a stick blender to help blend the last few stubborn bits of cream cheese in, but a whisk will work too.
2. Separate buns and spoon cinnamon glaze icing over them (letting a little bit drip deliciously down the sides to pool on the plate ready to be mopped up by the non-iced inside bits...) And serve. Savour or devour at your preference (I savour, Lincoln devours).

If you want to serve them later...
1. Brush with melted butter, let cool, then cover tightly with plastic wrap. Or freeze in foil. Just before serving, heat in oven at 200C (350F) for 10 minutes (a bit longer if frozen).
2. Serve with glaze, amazing all and sundry with your fresh homemade cinnamon buns (that appear to have been whipped up in a few minutes with magician-like kitchen prowess).


Thursday, December 27, 2012

Introducing: A Moist Vanilla Cupcake

Come and view this post on my new page:  Red Hill Recipes


You know those times when you find yourself sitting in a comfy chair, gazing off into space thinking warm fuzzy thoughts and daydreaming of a moist, tender cupcake that melts in your mouth? No? Oh well, maybe that’s just me...


Sadly though, I was woefully disappointed the first few times I made fructose free cupcakes in honour of such times. I don’t mean to sound melodramatic, but they really were such dense little, dry, crumbly affairs. And to top it all off (literally) the icing was gritty. That's dextrose for you... it doesn't dissolve the way sugar does, and I've learned since those early attempts that you need to pulverize it in a food processor (or similar, a blender will work too), and make it into 'icing dextrose' first. But as I was saying...


...My family was quite polite about these baking efforts, which were more or less edible when consumed immediately after baking. Lincoln was willing to choke one or two down like a man (probably considering it a marital obligation). But there were always plenty of leftovers. Unheard of! Then, left to their own devices for a few hours, they magically transformed themselves into medium density particle board. So. Very. Far. from the moist melty cupcake of my daydream. A.K.A: the full fructose Betty Crocker packet mix of a previous sugar-consuming existence. Yes. A packet mix was once the secret to my cupcake fame... one with a sachet of ready made frosting. (That’s a little embarrassing, to be honest...)


One can’t just resign herself to a cupcake-less existence though. Especially these days when they are enjoying such a moment in the trendy dessert spotlight! I was (and still am!) quite determined not to make our fructose free choice feel like deprivation.


So with much recipe tweaking and many cake tragedies, I finally arrived at a fluffy moist result that is just as good as Betty Crocker. Even better, since a ‘from scratch’ recipe doesn’t feel like cheating. Certainly better for us, with no unpronounceable ingredients.


And even better still, these cupcakes will still be moist and lovely a couple of days after they are baked.

Moist Vanilla Cupcakes

This recipe makes a dozen.

1/4 c (60gr) softened butter
1/4 c (45 gr) dextrose
1/4 c (80 gr) glucose syrup
1/2 c (150 gr) rice malt syrup
2 Tbsp (20ml Tbsp not 15!) macadamia oil (or other mild oil)
1/2 c (100 gr) buttermilk (or sour milk - add 2 tsp lemon juice or vinegar to 1/2 c milk and wait 5 minutes)
1/2 tsp vanilla bean paste (real vanilla bean is great too - or just use vanilla extract)
2 eggs
1/4 tsp pure non-bitter stevia powder
1 3/4 c plain flour (all purpose flour)
1/4 c corn flour (also called corn starch)
1 Tbsp (20 ml Tbsp not 15!) baking powder
1/4 tsp salt

1. Cream butter and dextrose until it turns very pale.
2. Add glucose syrup, rice malt syrup, oil, buttermilk, vanilla, eggs, stevia and salt. Blend until well combined and smooth.
3. Sift flour, corn flour and baking powder together. Mix well with a wire whisk or fork.
4. Add 1/2 of the flour to the batter. Stir very gently (not till smooth, just a few stirs) Add the rest of the flour. Stir gently again.
5. Beat for just a few seconds until smooth - the trick for a tender cupcake is not to beat the flour too much (or the gluten develops and makes it tough).
6. Pour batter into a 12 hole cupcake tin lined with papers.
7. Bake at 150C (300F) for 18 - 20 minutes, turning half way through (unless your oven bakes much more evenly than mine)
8. Let cool, then ice and devour.


Vanilla Butter Creamcheese Icing
(I am still perfecting this, but this version is pretty good)

1/3 c (70 gr) softened butter
1/3 c (70 gr) softened cream cheese
1/4 tsp vanilla
1 c (150 gr) icing dextrose (see note below about how to do this)
Pinch of stevia powder (1/16 tsp)

1. Blend butter, cream cheese and vanilla together.
2. Add icing dextrose and blend until very smooth.
3. Pipe or spread onto cupcakes (or just eat it with a spoon if nobody is looking)

Note: To make icing dextrose, add the dextrose to a food processor or blender and pulse/blend till very, very fine (ummm, like icing sugar!). You will need to stir it a few times, but let it settle before taking the lid off or you will have clouds of powdered dextrose floating around your kitchen! I like to blend a whole packet of dextrose at a time, and keep it in a container ready for the next icing episode.


Wednesday, December 19, 2012

A Gingersnap With Snap

Come and view this post on my new page:  Red Hill Recipes


What is it about Christmas and ginger? They kind of seem to go hand in hand somehow. Almost as cozy as a romance. Well maybe not, but anyway, it’s only a week out from Christmas day... which we are going to be spending with Lincoln’s (my husband’s) family, most of whom still cook with sugar. I can’t quite imagine Christmas without some sort of sweet ginger-y, spice infused confection. A whole line-up of them would be nice, really.


I have always enjoyed supplying plenty of baking when we all get together at Christmas time. But these days even more so, because if I do then we fructose-free weirdos can have some treats too, and not feel deprived. (No, enlightened, not weird!) And so today I find myself contemplating my next flurry of kitchen activity with a ginger theme.


I have got some gingerbread man dough chilling in the fridge which needs rolling out, and cookie-cuttering. But that’s very messy, and we have visitors coming tomorrow morning (I don’t need to go into any more detail than that in my reasoning against the gingerbread man process today, do I?)


All up I kind of feel like a less arduous act of ginger-ish-ness. It’s mid-afternoon, and I’m feeling lazy. Plus I have a friend or two who are interested in my crunchy gingersnaps. And the longer I prattle on about it in a blog post, justifying my rationale, the longer I can sit on the couch with my coffee procrastinating...


Nevermind. They are easy, once you get into the kitchen!


*Aack! I have just corrected a typo in the Glucose syrup amount below. Hope nobody made these before I picked that up... My apologies if you did!

Crunchy Gingersnaps

This recipe makes heaps of gingersnaps!

1 c (200 gr) Butter
1 1/3 c (380 gr) Glucose syrup
1/2 tsp pure 'non-bitter' Stevia powder (NuNaturals brand if possible. Stevia's are not all equal, some are horrible.)
1/2 tsp Salt
2 tsp Bicarb Soda (Baking Soda)
1 tsp Cinnamon
1 Tbsp Ginger powder (I use a 20 ml Aussie tbsp. The North American tbsp is 15 ml so add an extra tsp if your spoon is a 15 ml!)
2 1/2 c Flour
1/4 c Dextrose (for rolling dough balls through to coat before baking)


1. Add butter, glucose syrup, stevia, salt, bicarb soda, cinnamon and ginger to a large mixing bowl. Beat till very pale.
2. Add flour. Beat. This mixture is quite thick, so if your beaters aren't powerful, you might want to mix by hand and save them from the effort...
3. Shape dough into small balls, about 1 1/2 - 2 cm, and roll through dextrose to coat.
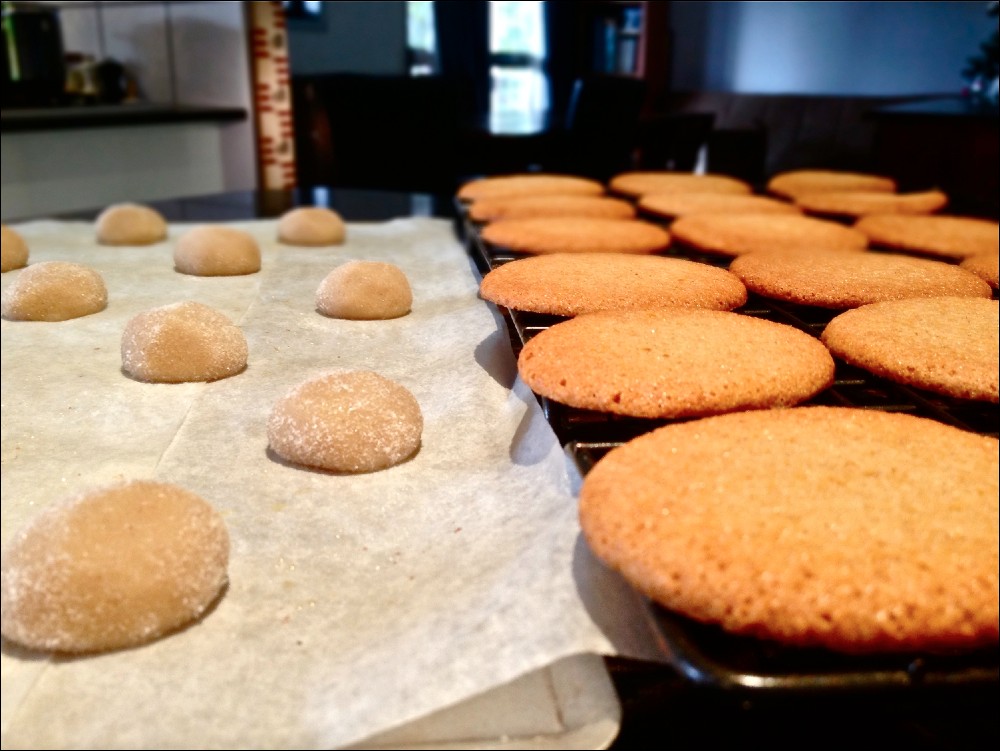
4. Place on baking tray leaving plenty of space for spreading! These spread a lot! (One of the photos above shows the size of a dough ball compared with the baked gingersnap to show how much they spread.)
5. Bake at 150C (300F) for 16-18 minutes turning half way through - unless your oven bakes evenly without doing so.

Thermomix method


1. Add butter, glucose syrup, stevia, salt, bicarb soda, cinnamon and ginger to Thermomix bowl.
2. Beat on speed 3 for 20 seconds, scrape sides down with spatula then beat again for another few seconds.
3. Add flour. Beat at speed 3 for 20 seconds or until well combined.
4. Shape dough into small balls, about 1 1/2 - 2 cm, and roll through dextrose to coat.
5. Place on baking tray leaving plenty of space for spreading! These spread a lot! (One of the photos above shows the size of a dough ball compared with the baked gingersnap to show how much they spread.)
6. Bake at 150C (300F) for 16-18 minutes turning half way through - unless your oven bakes evenly without doing so.


This makes a great dunking cookie, if you are into that! Perfect with tea, coffee or a glass of cold milk...