Tuesday, January 8, 2013

The Cinnamon Bun Rescue

Come and view this post on my new page:  Red Hill Recipes


When I was a little girl my Mom would bake bread every so often. It was an all day project yielding dozens of loaves, most of which were destined for the big chest freezer, and from there, loaf by loaf to our lunch boxes. She usually did this when my sisters and I were at school. I loved Bread Baking Day because the last lump of dough was always made into cinnamon buns, and thoughtfully timed so that they were coming out of the oven (smelling utterly divine) just as we girls walked in the door after school. Thusly began my long, affectionate, decadent (and sometimes rocky) relationship with cinnamon buns. All would be smooth sailing, I’m sure, if only they were healthier.


 Sigh... The carbs! The butter! The sugar!

...Well it seems that nothing can be done about the carb guilts. But ah! ...the sugar guilts can easily be done away with now, armed as we are with some new knowledge and having done some recipe trials. And as a bonus, the said new knowledge also kindly lifts the butter guilts - it turns out that there’s hardly anything healthier than good old delicious butter! (Yes, veggies, I know, but they have no place in this paragraph, so shh). Two guilts down, one to go.

And we are back to just carb guilts. Happily though, I can handle that once in a while.


 This is one of those whiles.


Of all the cinnamon bun recipes I’ve tried I like this one best. Most home baked cinnamon buns need to be eaten pretty quick or they dry out (full sugar or fructose-free, it makes no difference). But these stay nice and soft and seem freshly baked a day later (I can bring out witnesses to this phenomenon if you don’t believe me!). This recipe saves sweetening the buns until we drizzle them with glaze icing just before serving, so they stay soft (instead of letting the dextrose sit all over them, sneakily drawing the moisture out while we wait to indulge).

Of course they tend to do a quick disappearing act right after leaving the oven. But theoretically, it’s possible to surprise everyone in the house with fresh cinnamon buns some Saturday morning (and not have to get up at 4am in order to do so). If you want to bake now and serve later, this is your recipe. They are quite delicious now though, so good luck with that.


Cinnamon Buns

This recipe is adapted from the King Arthur Flour one and makes 18 buns

Dough

3 1/2 cups (420 gr) bakers flour (plain/all purpose flour will work too if you haven't got that)
2 tsp instant yeast
2 Tbsp (20 gr) (I use a 20 ml tbsp not 15 ml!)potato flour (or 1/4 cup instant mashed potato flakes)
2 Tbsp (20 gr) milk powder (dry milk)
3 Tbsp (35 gr) dextrose
1 1/2 tsp salt
4 Tbsp (60 gr) softened butter
2/3 cup (150 gr) lukewarm water
1/2 cup (115 gr) lukewarm milk

Filling

1 Tbsp cinnamon (20 ml)

Topping

2 Tbsp melted butter

Cinnamon Glaze Icing
1/4 cup (60 gr) cream cheese
2 Tbsp cream
1/4 tsp cinnamon
1 cup dextrose

Instructions

Oven temp 160C (320F)

1. Add all of the dough ingredients to a large bowl, mix and knead. You can use your hands, a mixer with a dough attachment, or bread machine with dough setting (I use my thermomix).
2. When the dough is smooth and soft, shape it into a ball, and put it in a greased bowl. Cover the bowl, leave it in a warm place and let it rise for about 90 minutes (or till doubled in size).
3. Gently punch the dough down, and place it on a lightly greased surface.
4. Roll the dough out into a rectangle shape about 30cm (12in) by 46cm (18in). Sprinkle all over with cinnamon (I like to use a small sieve).
5. Starting from the long side, roll the dough up into a long log and pinch the edges together to seal. You can stretch the log a bit if the dough has 'shrunk' during rolling.
6. Using a ruler or tape measure, make a knife mark on the log at 2.5cm (1 in) intervals. Cut the dough into rolls using your marks to make them even. The easiest, neatest way is to use dental floss for this. Slip a string of floss under the log, bring the ends together over one of your marks and pull tight till the floss cuts right through.
7. Place the cut rolls into a greased baking pan, spacing them evenly apart. I use a 33x23x5cm (13x9x2in) ceramic baking dish, but you could use two smaller ones, or whatever other convenient pans you have on hand.
8. Let the buns rise until they are all puffy and cozily crowded together, about 90 minutes.
9. Bake at 160C (320F) for 20-24 minutes, turning half way through (unless your oven bakes more evenly than mine). They should look golden brown, and spring back when gently touched in the center.
10. Brush the buns with melted butter (I like salted butter for this). Let them cool slightly (if you can resist that long).

Cinnamon Glaze Icing
1. Add cream cheese, cream, cinnamon, and dextrose to a small saucepan, heat on medium until the cream cheese melts and the dextrose dissolves. I use a stick blender to help blend the last few stubborn bits of cream cheese in, but a whisk will work too.
2. Separate buns and spoon cinnamon glaze icing over them (letting a little bit drip deliciously down the sides to pool on the plate ready to be mopped up by the non-iced inside bits...) And serve. Savour or devour at your preference (I savour, Lincoln devours).

If you want to serve them later...
1. Brush with melted butter, let cool, then cover tightly with plastic wrap. Or freeze in foil. Just before serving, heat in oven at 200C (350F) for 10 minutes (a bit longer if frozen).
2. Serve with glaze, amazing all and sundry with your fresh homemade cinnamon buns (that appear to have been whipped up in a few minutes with magician-like kitchen prowess).


Thursday, December 27, 2012

Introducing: A Moist Vanilla Cupcake

Come and view this post on my new page:  Red Hill Recipes


You know those times when you find yourself sitting in a comfy chair, gazing off into space thinking warm fuzzy thoughts and daydreaming of a moist, tender cupcake that melts in your mouth? No? Oh well, maybe that’s just me...


Sadly though, I was woefully disappointed the first few times I made fructose free cupcakes in honour of such times. I don’t mean to sound melodramatic, but they really were such dense little, dry, crumbly affairs. And to top it all off (literally) the icing was gritty. That's dextrose for you... it doesn't dissolve the way sugar does, and I've learned since those early attempts that you need to pulverize it in a food processor (or similar, a blender will work too), and make it into 'icing dextrose' first. But as I was saying...


...My family was quite polite about these baking efforts, which were more or less edible when consumed immediately after baking. Lincoln was willing to choke one or two down like a man (probably considering it a marital obligation). But there were always plenty of leftovers. Unheard of! Then, left to their own devices for a few hours, they magically transformed themselves into medium density particle board. So. Very. Far. from the moist melty cupcake of my daydream. A.K.A: the full fructose Betty Crocker packet mix of a previous sugar-consuming existence. Yes. A packet mix was once the secret to my cupcake fame... one with a sachet of ready made frosting. (That’s a little embarrassing, to be honest...)


One can’t just resign herself to a cupcake-less existence though. Especially these days when they are enjoying such a moment in the trendy dessert spotlight! I was (and still am!) quite determined not to make our fructose free choice feel like deprivation.


So with much recipe tweaking and many cake tragedies, I finally arrived at a fluffy moist result that is just as good as Betty Crocker. Even better, since a ‘from scratch’ recipe doesn’t feel like cheating. Certainly better for us, with no unpronounceable ingredients.


And even better still, these cupcakes will still be moist and lovely a couple of days after they are baked.

Moist Vanilla Cupcakes

This recipe makes a dozen.

1/4 c (60gr) softened butter
1/4 c (45 gr) dextrose
1/4 c (80 gr) glucose syrup
1/2 c (150 gr) rice malt syrup
2 Tbsp (20ml Tbsp not 15!) macadamia oil (or other mild oil)
1/2 c (100 gr) buttermilk (or sour milk - add 2 tsp lemon juice or vinegar to 1/2 c milk and wait 5 minutes)
1/2 tsp vanilla bean paste (real vanilla bean is great too - or just use vanilla extract)
2 eggs
1/4 tsp pure non-bitter stevia powder
1 3/4 c plain flour (all purpose flour)
1/4 c corn flour (also called corn starch)
1 Tbsp (20 ml Tbsp not 15!) baking powder
1/4 tsp salt

1. Cream butter and dextrose until it turns very pale.
2. Add glucose syrup, rice malt syrup, oil, buttermilk, vanilla, eggs, stevia and salt. Blend until well combined and smooth.
3. Sift flour, corn flour and baking powder together. Mix well with a wire whisk or fork.
4. Add 1/2 of the flour to the batter. Stir very gently (not till smooth, just a few stirs) Add the rest of the flour. Stir gently again.
5. Beat for just a few seconds until smooth - the trick for a tender cupcake is not to beat the flour too much (or the gluten develops and makes it tough).
6. Pour batter into a 12 hole cupcake tin lined with papers.
7. Bake at 150C (300F) for 18 - 20 minutes, turning half way through (unless your oven bakes much more evenly than mine)
8. Let cool, then ice and devour.


Vanilla Butter Creamcheese Icing
(I am still perfecting this, but this version is pretty good)

1/3 c (70 gr) softened butter
1/3 c (70 gr) softened cream cheese
1/4 tsp vanilla
1 c (150 gr) icing dextrose (see note below about how to do this)
Pinch of stevia powder (1/16 tsp)

1. Blend butter, cream cheese and vanilla together.
2. Add icing dextrose and blend until very smooth.
3. Pipe or spread onto cupcakes (or just eat it with a spoon if nobody is looking)

Note: To make icing dextrose, add the dextrose to a food processor or blender and pulse/blend till very, very fine (ummm, like icing sugar!). You will need to stir it a few times, but let it settle before taking the lid off or you will have clouds of powdered dextrose floating around your kitchen! I like to blend a whole packet of dextrose at a time, and keep it in a container ready for the next icing episode.


Wednesday, December 19, 2012

A Gingersnap With Snap

Come and view this post on my new page:  Red Hill Recipes


What is it about Christmas and ginger? They kind of seem to go hand in hand somehow. Almost as cozy as a romance. Well maybe not, but anyway, it’s only a week out from Christmas day... which we are going to be spending with Lincoln’s (my husband’s) family, most of whom still cook with sugar. I can’t quite imagine Christmas without some sort of sweet ginger-y, spice infused confection. A whole line-up of them would be nice, really.


I have always enjoyed supplying plenty of baking when we all get together at Christmas time. But these days even more so, because if I do then we fructose-free weirdos can have some treats too, and not feel deprived. (No, enlightened, not weird!) And so today I find myself contemplating my next flurry of kitchen activity with a ginger theme.


I have got some gingerbread man dough chilling in the fridge which needs rolling out, and cookie-cuttering. But that’s very messy, and we have visitors coming tomorrow morning (I don’t need to go into any more detail than that in my reasoning against the gingerbread man process today, do I?)


All up I kind of feel like a less arduous act of ginger-ish-ness. It’s mid-afternoon, and I’m feeling lazy. Plus I have a friend or two who are interested in my crunchy gingersnaps. And the longer I prattle on about it in a blog post, justifying my rationale, the longer I can sit on the couch with my coffee procrastinating...


Nevermind. They are easy, once you get into the kitchen!


*Aack! I have just corrected a typo in the Glucose syrup amount below. Hope nobody made these before I picked that up... My apologies if you did!

Crunchy Gingersnaps

This recipe makes heaps of gingersnaps!

1 c (200 gr) Butter
1 1/3 c (380 gr) Glucose syrup
1/2 tsp pure 'non-bitter' Stevia powder (NuNaturals brand if possible. Stevia's are not all equal, some are horrible.)
1/2 tsp Salt
2 tsp Bicarb Soda (Baking Soda)
1 tsp Cinnamon
1 Tbsp Ginger powder (I use a 20 ml Aussie tbsp. The North American tbsp is 15 ml so add an extra tsp if your spoon is a 15 ml!)
2 1/2 c Flour
1/4 c Dextrose (for rolling dough balls through to coat before baking)


1. Add butter, glucose syrup, stevia, salt, bicarb soda, cinnamon and ginger to a large mixing bowl. Beat till very pale.
2. Add flour. Beat. This mixture is quite thick, so if your beaters aren't powerful, you might want to mix by hand and save them from the effort...
3. Shape dough into small balls, about 1 1/2 - 2 cm, and roll through dextrose to coat.
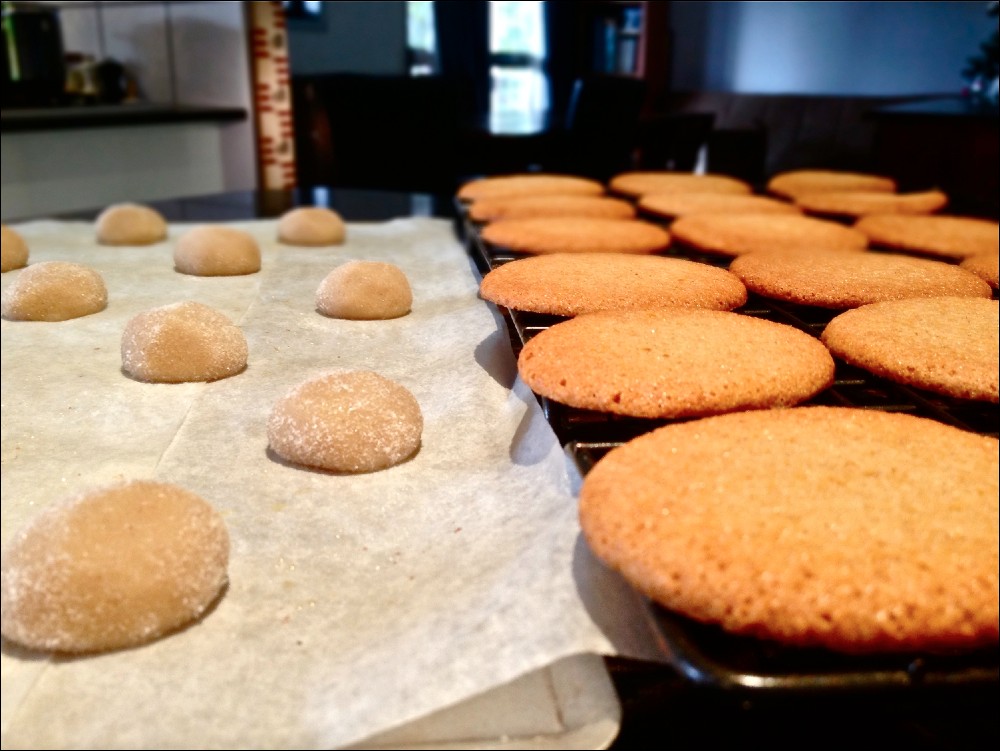
4. Place on baking tray leaving plenty of space for spreading! These spread a lot! (One of the photos above shows the size of a dough ball compared with the baked gingersnap to show how much they spread.)
5. Bake at 150C (300F) for 16-18 minutes turning half way through - unless your oven bakes evenly without doing so.

Thermomix method


1. Add butter, glucose syrup, stevia, salt, bicarb soda, cinnamon and ginger to Thermomix bowl.
2. Beat on speed 3 for 20 seconds, scrape sides down with spatula then beat again for another few seconds.
3. Add flour. Beat at speed 3 for 20 seconds or until well combined.
4. Shape dough into small balls, about 1 1/2 - 2 cm, and roll through dextrose to coat.
5. Place on baking tray leaving plenty of space for spreading! These spread a lot! (One of the photos above shows the size of a dough ball compared with the baked gingersnap to show how much they spread.)
6. Bake at 150C (300F) for 16-18 minutes turning half way through - unless your oven bakes evenly without doing so.


This makes a great dunking cookie, if you are into that! Perfect with tea, coffee or a glass of cold milk...


Monday, December 17, 2012

A Snickerdoodle Story

Come and view this post on my new page:  Red Hill Recipes


So today is all about my love affair with the delightful Snickerdoodle cookie.  (Such an odd name!) I have an aunt who used to always make them at Christmas time, and I always loved their cinnamon-y deliciousness. I find Christmas quite a suitable time for nostalgia of all sorts, so this week seemed a perfect time to tackle Snickerdoodles.


I had a lot of trouble with my cookies after we stopped using sugar. They just wouldn’t go crispy! I honestly have nothing against a good soft cookie, in it’s place, but not when the gingersnaps were gingerdroops. The flavour was still yummy, but it was so annoying that I actually stopped making cookies for nearly a year. Yes. Almost a year with no cookies. My poor children... The Snickerdoodles are not a really crunchy cookie - they are crunchy on the outside, and soft in the middle. And if you leave them out in humidity they go soft, so store them in an airtight container as soon as they cool. And of course, you can leave them in the oven for a few extra minutes to give them a little extra crunch. But watch carefully if you do... don't burn them!


See, dextrose, which is the main alternative to sugar advocated by the fructose-free gurus, really is a tasty bit of business. But it works very differently in baking. My baking results were all over the place when I tried to use my normal recipes and just replace sugar with dextrose. They all burned quickly, cookies didn’t get crispy, cakes were dry, and then if I did manage to get an edible result we had to polish it off within a couple of hours before it spontaneously turned into sawdust. They just went stale and hard so annoyingly fast. Grrr. I much prefer making things a day (or two) ahead of parties and the like, so that I can be cool, calm and collected on the day. As opposed to running around like a madwoman at the last moment. Not pretty. Really. And my family prefers not to have the madwoman put in an appearance either.


So I started making notes every time I made something. Each time I baked, I’d tweak the recipe and make notes about the result. Then later, some suggestions for further changes. And eventually I came up with a very snappy gingersnap! And in time, a cupcake that was moist and tender - even two days after being baked!


But I digress... today will be an ode to the Snickerdoodle. Just in time for Christmas.


Snickerdoodle Cookies

This recipe makes 5 dozen cookies

1 cup (160 gr) dextrose (you can find this in the brewing section at the supermarket.)
1/2 cup (160 gr) glucose syrup (this stuff is much easier to weigh than measure. It's very sticky!)
1/4 tsp pure 'good tasting' stevia powder (NuNaturals brand if possible. Stevia's are not all equal, some are horribly bitter.)
1/2 cup (125 gr) lard
1/4 cup (65 gr) butter
2 eggs
1/4 tsp salt
2 3/4 cups (420 gr) self raising flour (or use plain flour plus 3 tsps baking powder)

Mixture for rolling dough balls through:

1/4 c dextrose
2 tsp cinnamon

1. Add dextrose, glucose syrup, stevia, lard, butter, eggs, and salt to a medium mixing bowl. Beat.
2. Beat in flour
3. Shape dough into 2 cm balls
4. In a small bowl combine cinnamon and dextrose mixture.
5. Roll dough balls through cinnamon mixture
6. Place on ungreased cookie sheet
7. Bake at 160C for 12-15 minutes, turning half way through (unless you have a fabulous oven that bakes things evenly)

THERMOMIX method:

1. Add everything except flour to thermomix bowl, mix on 3 for 15 seconds.
2. Add flour, combine slightly with spatula (I like a stiff narrow silicon one for this rather than the thermomix one)
3. Set to lid closed, and interval setting for 15-20 seconds (till it looks combined).
4. Shape and coat dough balls as explained above.


Enjoy!


Saturday, December 15, 2012

Why bother?

Come and view this post on my new page:  Red Hill Recipes


Post #1 is an odd thing isn’t it? You kind of feel like you ought to explain yourself, and justify to the general public (who may potentially someday read about a portion of your life) just why it is you think you have anything of interest to put out there.

I mean there are millions of kitchen/cooking/baking based blogs and websites out there already, right?

Here’s the thing. About 15 months ago I was looking for answers to some health issues I was concerned about. Ok. I’ll be honest. I wanted to lose weight. Was trying and couldn’t. Along with half the population of all first world countries no doubt. That may be an exaggeration. But maybe not. There is certainly no doubt at all that we are seeing an epidemic of obese/over-weight people in our culture. I’d rather not be numbered part of it though, thanks.

The trouble is I am not a scholar. I’m not a medical practitioner. I’m not even trained to understand how studies are done and whether or not they are trustworthy. I’m a run of the mill girl who didn’t know what to make of all the conflicting health, nutrition and diet information out there. Have you ever looked up this topic in a bookstore? It’s bewildering! You will find an entire wall full of books that disagree with one another as to what a person ought to do. Blood types. Vegan. Raw. Liver cleanse. You name it. Then beyond the book store, Weight Watchers, Jenny Craig, Blah, Blah, Blah. And online it is worse. I can't follow all of them. Who's advice should I believe?

So, luckily for me I know some really smart people. Am actually related to some. On one hand my husband’s sister is a medical specialist who is currently researching treatment and/or cures for obesity (and by association, help for all it’s nasty friends : diabetes, heart disease, high blood pressure, fatty liver disease, dementia et al). And on the other hand my husband’s parents are both highly respected naturopaths (definitely no quackiness) who help people with their health and weight issues every day.

Yes they can sometimes be scarily intimidating in their smartness, but they have also been quite happy to help me pick through the myths and the hear-say and find the facts. And so I’ve become armed with some solid scientific, and medically proven tools that a person like me can really use to help themselves. Between all of these clever brains to pick, I have been able to come up with some answers.

Sadly, (for my tongue) those answers turned out to pretty much all lay at the feet of simple carbohydrates - in particular, sugar, which is half composed of the evil fat-inducing demon fructose. If you want to read a couple of books that will really help, you can start with this book by David Gillespie: "The Sweet Poison Quit Plan", and follow up with this one by Gary Taubes: "Why We Get Fat - and what to do about it".

The facts led us to decide that we will no longer eat sugar in our house. Well, fructose anyway. I won't bother explaining why, since I assume that people who find themselves reading a thing about a fructose-free kitchen already understand that it’s an addictive poison and should be avoided.

This blog is not meant to be a soap-box descrying the evils of the food industry and the misinformation in the nutritional guidelines (although I probably won’t be able to resist getting my high horse out for the odd gallop now and then). It’s actually meant to be a platform for sharing recipes that I’ve developed for our family (so I'll leave the high horse stabled for now).

See we still wanted to enjoy some sweet things in life! And also try not to seem like aliens to our sugar-eating friends. Which is where we (finally!) get to the point of this blog. I have learned lots about what doesn't work. To the point where I am starting to learn what does. And now I have people asking me about my recipes. So this blog is a place for my success stories. (Now that I have some!) Recipes and photos coming soon!